Soluzioni di stampa 3D
Mercato dei ricambi per autoveicoli
Forniamo resine che consentono di realizzare parti stampate con l'aspetto e le prestazioni della plastica stampata a stampo. Un'alternativa conveniente, collaudata in applicazioni reali e utilizzabile in qualsiasi condizione atmosferica.
Titan produce componenti di grandi dimensioni e di precisione dimensionale per numerose applicazioni nel settore automobilistico, quali pannelli e coperture.
La tecnologia Magna si è dimostrata il metodo più efficace per la produzione di componenti di piccole e medie dimensioni destinati al settore dell'aftermarket automobilistico. Ha permesso di realizzare centinaia di migliaia di pezzi per aziende che, in genere, dispongono di numerosi modelli con volumi di produzione medio-bassi che non giustificano l'utilizzo di stampi.
Per grandi volumi di componenti funzionali, c'è una sola soluzione: Magna.

Soluzioni di stampa 3D
Mercato dei ricambi per autoveicoli
La tecnologia Magna si è dimostrata il metodo più efficace per la produzione di componenti di piccole e medie dimensioni destinati al settore dell'aftermarket automobilistico. Ha permesso di realizzare centinaia di migliaia di pezzi per aziende che, in genere, dispongono di numerosi modelli con volumi di produzione medio-bassi che non giustificano l'utilizzo di stampi.
Forniamo resine che consentono di realizzare parti stampate con l'aspetto e le prestazioni della plastica stampata a stampo. Un'alternativa conveniente, collaudata in applicazioni reali e utilizzabile in qualsiasi condizione atmosferica.
Titan produce componenti di grandi dimensioni e di precisione dimensionale per numerose applicazioni nel settore automobilistico, quali pannelli e coperture.
Per grandi volumi di componenti funzionali, c'è una sola soluzione: Magna.

Stampa di pannelli automobilistici di grandi dimensioni e complessi per Magna International
Magna International aveva bisogno di 10 contenitori di grandi dimensioni per ospitare i componenti elettrici destinati ai veicoli di prova. La stampa 3D era l'unica opzione possibile, ma la tecnologia SLA laser di grande formato risultava troppo costosa e troppo lenta, e i pezzi non sarebbero stati funzionali. Questa è la storia di alcuni dei pezzi più grandi mai stampati con la tecnologia Free Radical, con una precisione sull'asse z pari in media a +/- 0,065%, realizzati con Liquid Crystal .


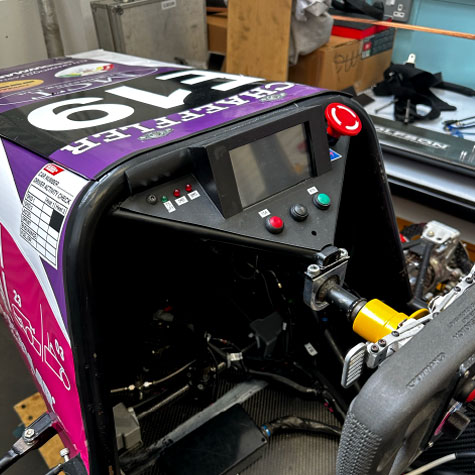
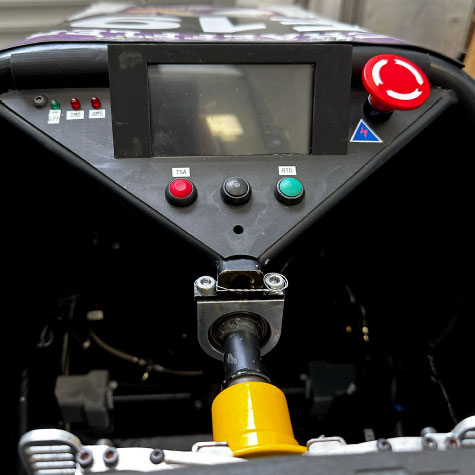
LUMotorsport
Dal 2003, LUMotorsport rappresenta l'Università di Loughborough agli eventi Formula Student in tutto il mondo. L'evento principale è la Formula Student UK, che si tiene ogni anno a Silverstone. L'anno scorso hanno partecipato oltre 60 squadre provenienti dal Regno Unito e da tutto il mondo. Il team ha gareggiato anche in Austria, Repubblica Ceca, Germania e Ungheria.
Nel 2023, LUMotorsport si è rivolta a Photocentric avvalersi della sua esperienza nel campo della stampa 3D. Grazie alla loro collaborazione, sono state stampate numerose parti aerodinamiche, attrezzature in materiale composito e scatole di derivazione elettriche conformi agli standard del motorsport per la vettura di quest'anno, utilizzando la stampante 3D Liquid Crystal , che offre le seguenti caratteristiche:
- Componenti di grandi dimensioni
- Geometria complessa e non planare
- Elevato rapporto tra altezza e superficie di contatto con il letto
- Finitura liscia della superficie per ridurre al minimo l'attrito cutaneo
- Maggiore libertà di progettazione per gli stampi in carbonio, senza i vincoli legati alla lavorazione dei blocchi per stampi
- Inserti più leggeri per le superfici aerodinamiche rispetto a quelli precedenti in alluminio


Pannello per roulotte Hymer
Stampa di prototipi su larga scala
Il VisionVenture, realizzato in collaborazione da BASF e HYMER, offre un assaggio del futuro della vita in camper, in una versione quasi definitiva. I pannelli della carrozzeria del prototipo sono stati stampati utilizzando la stampante Liquid Crystal .


Hymer Panel
Dettagli di stampa:
Stampante: Liquid Crystal
Dimensioni: 920 (L) x 470 (A) x 600 mm (P)
Tempo di stampa: 40 ore
Risoluzione: 100 µm
Volume della resina: 800 g
Resina: Daylight Hard Black
Costo unitario: 48,96 €


Fase 1 - Progettazione per la produzione additiva
Sebbene il progetto fornito da Magna International tenesse conto delle linee guida per la produzione additiva, era comunque necessaria un'ottimizzazione del progetto. Il progetto originale avrebbe subito deformazioni durante la produzione, ma Photocentric concessa libertà di progettazione sulle superfici non a vista, a condizione che fossero rispettate le dimensioni esterne e che le tolleranze fossero rispettate su un totale di 18 misure critiche. È stato aggiunto un riempimento a giroide con una struttura di 1,2 mm per 12 mm. Per rispettare le tolleranze è stata applicata una correzione di progetto per il ritiro dello 0,5% in x:y e dello 0,1% in z.

Fase 2 - Supporto per il rispetto delle tolleranze dei componenti
Il pezzo è stato orientato con un angolo di 60 gradi per evitare bruschi cambiamenti di forza durante la stampa. La rete di supporti è stata generata tramite la funzione di supporto automatico del software Voxel Dance per Photocentric. La densità dei supporti è stata ridotta al minimo necessario per limitare il consumo di resina di supporto e il lavoro di levigatura. La lunghezza delle punte dei supporti è stata ottimizzata a 0,6 mm per garantire un equilibrio tra il livello minimo di sostegno fisico necessario per il pezzo e la facilità di rimozione dei supporti.
Le sagome ritagliate si deformano a causa delle variazioni di forza quando si raggiunge il pannello aperto. Per garantire la precisione dimensionale delle sagome ritagliate, è possibile inserire dei supporti oppure, più semplicemente, inserire sottili piastre di rinforzo da 3 mm con alcuni punti di fissaggio.

Fase 3 - Stampa
I requisiti relativi alle proprietà dei materiali per l'involucro sono stati soddisfatti dalla resina BASF EPD2006.
Il file compatibile è stato caricato su un Liquid Crystal .
Il file è stato stampato con strati da 100 µm, per un totale di 68 ore (7223 strati). Il pezzo pesava 4591 g, di cui 2062 g di supporti.

Fase 4 - Processo di lavaggio
Al termine della stampa, la piattaforma era stata sgocciolata dalla resina in eccesso, che era stata reimmessa nel serbatoio. La piattaforma è stata trasferita tramite il Photocentric all'unità Photocentric XL. Lo sportello è stato chiuso, la pompa di lavaggio attivata e la piattaforma impostata sulla rotazione continua. L'operatore ha utilizzato la lancia di lavaggio per spruzzare una soluzione a ricircolo di Photocentric Cleaner 30 su tutte le aree del pezzo. La pulizia completa ha richiesto 15 minuti. Al termine del ciclo di lavaggio, il liquido di pulizia è stato scaricato nel contenitore IBC e la pompa è stata impostata sul risciacquo. Il pezzo è stato risciacquato con acqua per 5 minuti per rimuovere ogni residuo di liquido di pulizia. Poiché l'acqua residua può lasciare aloni bianchi sui pezzi, è stata utilizzata la lancia ad aria per un paio di minuti.

Fase 5 - Processo di indurimento
Il sistema di trasferimento della piattaforma è stato quindi utilizzato per spostare la piattaforma sul Photocentric XL. La piattaforma è stata ruotata continuamente per garantire una polimerizzazione uniforme. È stata sottoposta a un trattamento post-polimerizzazione completo, che ha previsto l'uso combinato di luce ad alta intensità a doppia lunghezza d'onda (405 nm e 460 nm) e calore a 60 °C per un totale di 5 ore.

Fase 6 - Rimozione del supporto
I sottili supporti Voxel Dance si sono staccati facilmente dal pezzo, lasciando solo qualche piccola imperfezione in rilievo che è stata poi levigata. Il tempo totale impiegato per la rimozione dei supporti è stato di 15 minuti.

Passaggio 7 - Aggiunta degli inserti
Abbiamo deciso di levigare ulteriormente il pezzo per circa 120 minuti, utilizzando una levigatrice orbitale, al fine di ottenere la migliore finitura superficiale possibile. Gli inserti necessari sono stati inseriti a martello nelle cavità. Il pezzo è stato verniciato a spruzzo con un primer e una mano di vernice nera.

Passaggio 8 - Apprendimento iterativo
Se avete già realizzato un pezzo simile in passato, saprete quanto sia fedele al progetto CAD. Se state stampando una nuova geometria complessa, potrebbero verificarsi scostamenti rispetto alle tolleranze o difetti; questi vengono misurati e poi corretti in modo iterativo.
Fase 1 - Progettazione per la produzione additiva
Sebbene il progetto fornito da Magna International tenesse conto delle linee guida per la produzione additiva, era comunque necessaria un'ottimizzazione del progetto. Il progetto originale avrebbe subito deformazioni durante la produzione, ma Photocentric concessa libertà di progettazione sulle superfici non a vista, a condizione che fossero rispettate le dimensioni esterne e che le tolleranze fossero rispettate su un totale di 18 misure critiche. È stato aggiunto un riempimento a giroide con una struttura di 1,2 mm per 12 mm. Per rispettare le tolleranze è stata applicata una correzione di progetto per il ritiro dello 0,5% in x:y e dello 0,1% in z.
Fase 2 - Supporto per il rispetto delle tolleranze dei componenti
Il pezzo è stato orientato con un angolo di 60 gradi per evitare bruschi cambiamenti di forza durante la stampa. La rete di supporti è stata generata tramite la funzione di supporto automatico del software Voxel Dance per Photocentric. La densità dei supporti è stata ridotta al minimo necessario per limitare il consumo di resina di supporto e il lavoro di levigatura. La lunghezza delle punte dei supporti è stata ottimizzata a 0,6 mm per garantire un equilibrio tra il livello minimo di sostegno fisico necessario per il pezzo e la facilità di rimozione dei supporti.
Le sagome ritagliate si deformano a causa delle variazioni di forza quando si raggiunge il pannello aperto. Per garantire la precisione dimensionale delle sagome ritagliate, è possibile inserire dei supporti oppure, più semplicemente, inserire sottili piastre di rinforzo da 3 mm con alcuni punti di fissaggio.
Fase 3 - Stampa
I requisiti relativi alle proprietà dei materiali per l'involucro sono stati soddisfatti dalla resina BASF EPD2006.
Il file compatibile è stato caricato su un Liquid Crystal .
Il file è stato stampato con strati da 100 µm, per un totale di 68 ore (7223 strati). Il pezzo pesava 4591 g, di cui 2062 g di supporti.
Fase 4 - Processo di lavaggio
Al termine della stampa, la piattaforma era stata sgocciolata dalla resina in eccesso, che era stata reimmessa nel serbatoio. La piattaforma è stata trasferita tramite il Photocentric all'unità Photocentric XL. Lo sportello è stato chiuso, la pompa di lavaggio attivata e la piattaforma impostata sulla rotazione continua. L'operatore ha utilizzato la lancia di lavaggio per spruzzare una soluzione a ricircolo di Photocentric Cleaner 30 su tutte le aree del pezzo. La pulizia completa ha richiesto 15 minuti. Al termine del ciclo di lavaggio, il liquido di pulizia è stato scaricato nel contenitore IBC e la pompa è stata impostata sul risciacquo. Il pezzo è stato risciacquato con acqua per 5 minuti per rimuovere ogni residuo di liquido di pulizia. Poiché l'acqua residua può lasciare aloni bianchi sui pezzi, è stata utilizzata la lancia ad aria per un paio di minuti.
Fase 5 - Processo di indurimento
Il sistema di trasferimento della piattaforma è stato quindi utilizzato per spostare la piattaforma sul Photocentric XL. La piattaforma è stata ruotata continuamente per garantire una polimerizzazione uniforme. È stata sottoposta a un trattamento post-polimerizzazione completo, che ha previsto l'uso combinato di luce ad alta intensità a doppia lunghezza d'onda (405 nm e 460 nm) e calore a 60 °C per un totale di 5 ore.
Fase 6 - Rimozione del supporto
I sottili supporti Voxel Dance si sono staccati facilmente dal pezzo, lasciando solo qualche piccola imperfezione in rilievo che è stata poi levigata. Il tempo totale impiegato per la rimozione dei supporti è stato di 15 minuti.
Passaggio 7 - Aggiunta degli inserti
Abbiamo deciso di levigare ulteriormente il pezzo per circa 120 minuti, utilizzando una levigatrice orbitale, al fine di ottenere la migliore finitura superficiale possibile. Gli inserti necessari sono stati inseriti a martello nelle cavità. Il pezzo è stato verniciato a spruzzo con un primer e una mano di vernice nera.
Passaggio 8 - Apprendimento iterativo
Se avete già realizzato un pezzo simile in passato, saprete quanto sia fedele al progetto CAD. Se state stampando una nuova geometria complessa, potrebbero verificarsi scostamenti rispetto alle tolleranze o difetti; questi vengono misurati e poi corretti in modo iterativo.